|
B/RB-45A/C Tornado
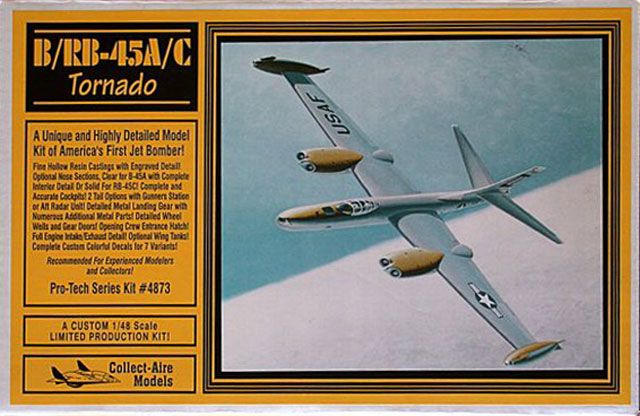
Collect-Aire Models, 1/48
S
u m m a r y
|
| Catalogue Number: |
Collect-Aire Models Kit #4873 -
B/RB-45A/C Tornado |
| Scale: |
1/48 |
| Contents and Media: |
Cream-colored resin; 2 vac-formed parts; decals for two versions |
| Price: |
USD$269.00
available online from http://collectaire.com |
| Review Type: |
FirstLook |
| Advantages: |
Neglected
subject; good detail; high quality castings; impressive
size; |
| Disadvantages: |
Instruction diagrams are lacking;
righteous bucks required to buy the kit |
| Recommendation: |
Highly Recommended to modellers with
some experience working with resin kits. |
Reviewed by
"Bondo" Phil Brandt

HyperScale is proudly supported by Squadron.com
The B-45 is notable as the first production American jet bomber. Filling
the technology gap between the end of WWII and the coming of the B-57, B-66
and the definitive B-47, four-jet B-45s played an important nuclear-capable
role in the early years of the Cold War. Further, RB-45Cs (some flown
clandestinely by RAF aircrews) conducted important data gathering intrusions
of the Soviet Union as well as deep photo penetrations of North Korea and
China in the early Fifties.
A very “mature” light colonel at Shaw AFB in ‘72 (who was flying the
attached B-57E Compass Site birds attached to this curmudgeon’s TAC recce
squadron), had actually flown these suckers, and I can remember how old that
made him seem to we young crewdogs. And now, thirty four years later, Ol’
Shakey nav Bondo’s in that same elderly airman category, too! What goes
around...
Kit Chronology
This is a little-done bird; the only previous release I can remember is
the 1/72, relatively bigbuck Mach 2 kit, which rests half-done in the Bondo
Industries production facility. As soon as I read of the Collect-Aire
announcement in my favorite scale–it must’ve been at least three years ago,
but to paraphrase the Collect-Aire honcho, Lou Maglio, “We may be late, but
we WILL do the model”–I put aside the labor-intensive French release,
probably for good. If I’m gonna be sentenced to “hard labor”, I’d much
rather it be in 1/48!
As a battle hardened Collect-Aire “investor” I steeled myself–even though
we’re talking righteous bucks here--to accept the idiosyncrasies that often
accompany these esoteric kits. I’m happy to say that at first look the B-45
has significantly fewer discrepancies than some of my previous acquisitions.
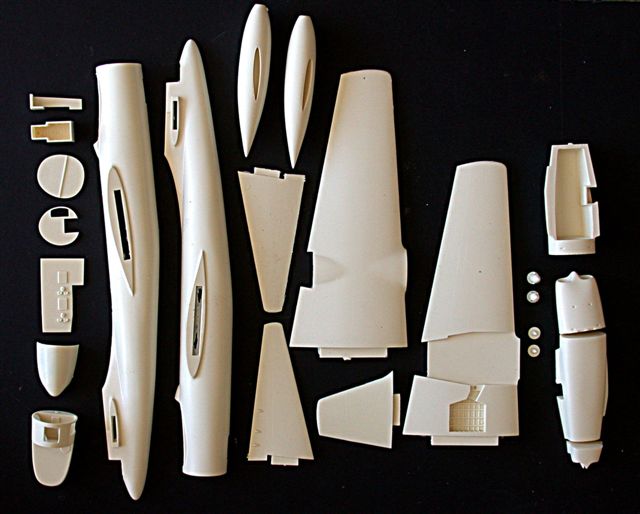
This is a BIG airframe, easily as large as the Monogram B-17. Wings are
solid, but the fuselage halves and central engine pod sections are
hollow-cast.
Molding
Overall exceptionally smooth (semigloss) surface strongly reminiscent of
Planet et al. I found only one small bubble at one of the wingtips. There is
very little flash on the medium-to-large parts, and engraving is very light
and crisp. Flying surface trailing edges are sharply done; no laborious
scraping down the six-scale-inch-thick trailing edges of the injected Mach2
kit! If I were to guess, I’d posit that the Central Euro elves in the Czech
Republic were the go-to guys for the project outsourcing. But, as HyperScale
bro, Grunticus, sez, “Others may know more.”
Fuselage
Done in hollow-cast halves from the front of the windscreen to the aft
tip of the empennage. The fuselage forward of the windscreen is a single
hollow cylindrical piece which accepts either the greenhouse of the bomber
version or the optional resin recce upper nose section.
Separate detail parts are provided to show off the interior of the
navigator/photo navigator/bombardier station forward of and below the pilot.
A separate crew entrance door enables some of these details to be seen. If
the recce version is chosen, the builder will have to scratchbuild a
vertical panel to separate the forward oblique camera station from the nav’s
office. There’s lots of room in the nose to add weight; I theenk you’re
gonna need it!
The tail crew position can be done in either of two configurations. The
bomber version provides a bulbous vacuformed greenhouse assembly, bulkhead,
gun housing and gunner seat. You’ll have to saw off the empennage tip to
effect this version, but the smoothly tapered recce version tail section is
what comes standard in the kit; just add the smaller vacuformed greenhouse,
smaller bulkhead and seat. The RB-45Cs deleted the gunner position, using
fixed position guns or none at all. As we modern day TAC recce pukes used to
say, “Alone, Unarmed and Unafraid.” Yeah, sure! The real version of this
motto substitutes “Scared ****less” for “Unafraid.” :)
If you’re going to do the recce version, as am I, you’ll need to cut camera
station windows into the bottom fuselage halves per a picture in the
instructions–I wish there was a window pattern, or at least provided
dimensions, instead of just a picture of what appears to be the underside of
a model. Then you’ll have to scratchbuild cameras and fabricate camera
windows from the flat clear sheet provided. The newly released 1/48
Trumpeter Wyvern includes a camera, and I’ll bet this could be cloned in
resin or, alternatively, one could simply glue a short piece of plastic tube
stock to a flat square and paint ‘er black, with a drop of epoxy in the tube
to simulate the lens. While we’re talking about camera windows, the
prominent forward oblique bulge at the tip of the nose has no engraving to
mark that this is actually a camera window. Reference pix clearly show the
delineation between the fuselage and said camera lens housing.
Wings
The long wings are real chunks of resin, albeit well done, with sharp
trailing edges and crisply cut out engine mating areas (some gap filling
will be needed, though, on either side of the joints between the underwing
and sides of each center engine pod, –I’m guessing that there’s been
“differential resin shrinkage” here because of the monolithic wing castings.
I’m somewhat concerned for the longterm implications of resin “droop” in the
outer wings, but there’s really little option here, unless the builder mills
spanwise slots in the undersides and inlays brass strips. The wings locate
tightly in fuselage cutouts. I did some dry fitting, and any gaps (or
thickness differences) at said wing/fuselage joint are minimal, definitely
better than in some past releases. Gear wells have lots of structural
detailing, but could use some piping and wiring as well (see the B-45 pix in
ARC).
Large, 1200 gallon tip tanks are smoothly molded with just a shade of mold
parting line discontinuity; minimal sanding will square this away. Receiving
slots for the wing tips mate fairly well. Very thin tank fins (three per
tank) are sharply done, but, for added toughness, could be fabricated out of
ten thou sheet.
Tail Surfaces
The vertical fin/rudder is one piece and keys into a slot in the
empennage. Each longspanned stabilizer is one piece, and each has integrated
hinge fairings and keys into pre-dihedraled bosses in the empennage. Again,
as with the rest of the kit major parts, all surfaces are very cleanly
molded with crisp, light engraving.
Engines
Each massive two-engine pod is cast in three sections: hollow center
(which fits in a pre-cast, wide slot in the wing bottom, a large, solid
forward portion, including both deep intake trunks (separate compressor and
exhaust faces) and a small aft exhaust section fairing, with outlets that
are about one inch deep.
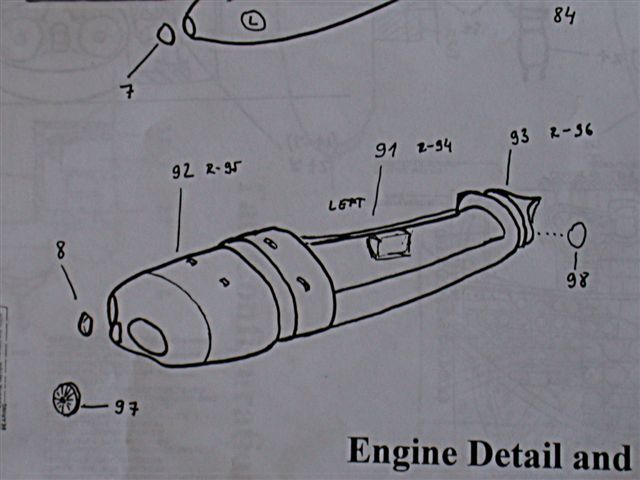
In the real thing, though, the J47 engines are almost entirely forward of
the center of the wing chord, with long tailpipe extensions. I may just
Dremel out the bulkhead in the aft fairing and install two-inch sections of
plastic tube to simulate the tail pipes. The hand drawn instructions show
virtually identical intake and exhaust faces, whereas my kit furnishes two
decidedly longer intake cones which appear correct.
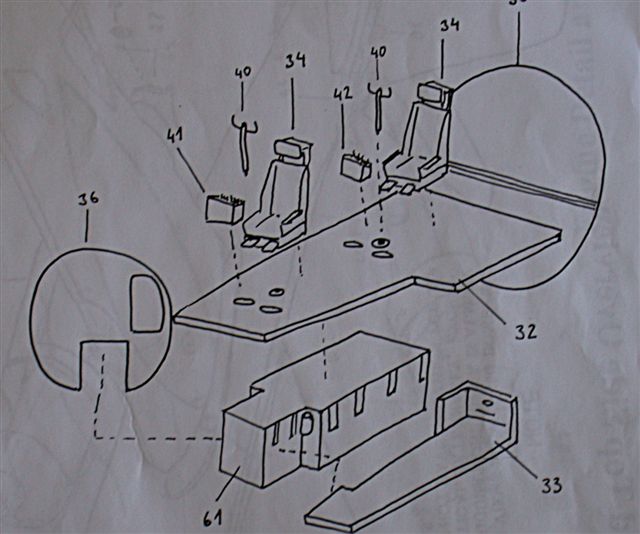
Cockpit
The left side cockpit floor of the B-45 is cut out, much like that of the
B-47, so that crewmembers may climb up to the seats on the flight deck after
entering from the lower entrance door. The kit has an externally detailed
nosegear well onto which the entrance floor is glued.
Although we’re certainly not talking Black Box or Aries here, the tandem
pilot/co-pilot seats aren’t bad, with molded-in belts and harnesses.
The concave cockpit walls have a fair amount of detail, and that’s good,
because the rest of the cockpit is somewhat sparse. A separately molded
instrument panel (with molded-in instrument circles) agrees with the
technical drawing (included) of the front seat layout. I wish the same type
drawing had been included for the back seat, because the rear instrument
panel provided is very small and merely attached to a thin, curved brace
between sidewalls. Maybe this is how things really are, but it would be much
better if the same type technical drawing had been provided as for the A/C
position.
While we’re talking documentation, the hand drawn assembly instructions
leave a lot to be desired when it comes to identifying and locating the
right side consoles.
The roughly-drawn assembly layout would seem to indicate both consoles to
be identical (although with differing part numbers), whereas they’re
apparently different. The included technical drawing of the cockpit front
shows just enough of the pilot’s right console that I was able to figure out
that part. The rear console is anyone’s guess, since there is no technical
drawing of that crew posotion included; all that was left out of the jumble
of parts in the baggy was a triangular piece with what might be a throttle
console on top. I’ve asked Lou for some guidance here, and am standing by.
Landing Gear
Sturdy, crisply molded metal gear struts will easily carry the weight of
this hefty airframe. A small baggy contains lots of tiny struts and the
strut oleo scissors. Large maingear tires have separately molded wheel
inserts which are decently detailed.
Each nose wheel and tire is cast together. Gear doors have some depressed
detail and molded-in hinges.

Clear Parts
The large vacuformed windscreen, canopy and bomber greenhouse are nicely
thin and very clear, much better than in some past releases. That said, it’s
gonna be fun to mask all that canopy bracing! The tail gunner greenhouse is
as well done as the frontal parts. I’ve already discussed the
scratchbuilding of the camera windows. Small pointed tip tank light housings
are provided as well as the tiny landing light housing which mounts between
the two left side intake trunks.
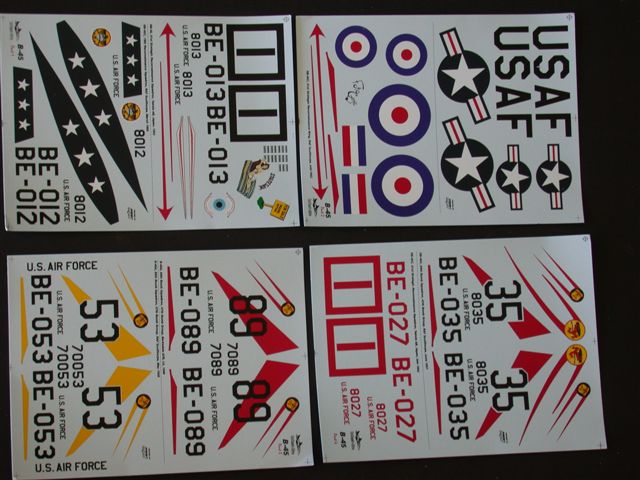
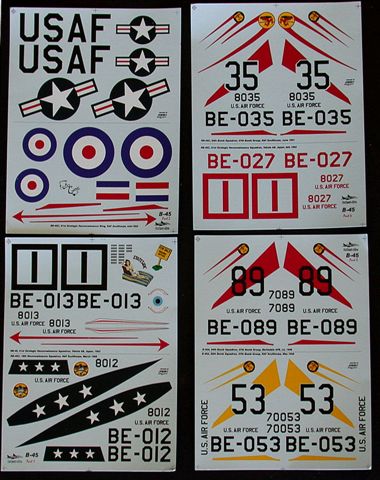
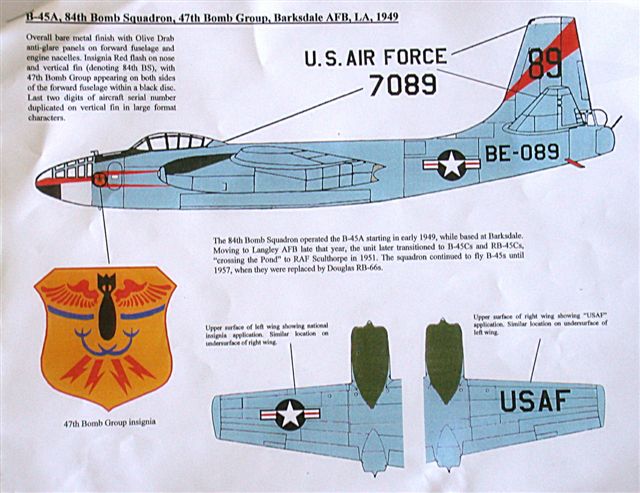
Decals and Color Schemes
Lotsa choices here! No less than four medium to large-sized sheets
offering seven choices of bomber/recce markings, even the one-off all-black
bird that made highspeed runs against North Korean AAA searchlights and also
a set of markings for the just recently de-classified mission birds flown by
the RAF over the Soviet Union. All decals, however, have been finished in a
semigloss, almost flat finish, as opposed to glossy, which is much more
desirable for applying over NMF schemes, or any glossy scheme, for that
matter. The other-than-glossy decals can change the look of the underlying
NMF (even when a glossy clearcoat is sprayed over the whole shootin’ match),
so I’d recommend trimming all markings as closely as possible, and maybe
using MicroScale/Aeromaster equivalents for numbers and letters.
Click the thumbnails below to
view larger images:
Instructions
As a retired Big Blue hardware tech writer, I always appreciate well-done
assembly /reference instructions. Unfortunately, such is not the case here.
Although the accompanying historical material from (I’m guessing) “other”
sources is good, the nitty gritty of assembly is not helped by the roughly
drawn parts illustrations, very much like–a name’s coming to me now...M...A..C..H....2!
Additionally, although each part has a number, it would be very helpful to
see a master parts layout illustration such as is usually included with most
injected kits and resin aftermarket sets. Normally, Collect-Aire small part
assemblies come in individual small sealed baggys to help differentiate
between the often many items. Not in my kit, however. Figuring things out is
not really neurosurgery, but ya just gotta grit yer teeth and press
on.........
This most welcome release fills a longstanding modeling void in the critical
years of Post WWII modern USAF jet aircraft development. I’m pleased to see
that some traditional failings in Collect-Aire productions such as overall
molding quality have been recognized and apparently solved. Yes, righteous
bucks are involved in purchasing this kit, but I doubt if it’ll soon be done
in 1/48 even by the CHICOMS. Highly recommended.
-
“America’s Great Jet Bomber Flyoff,”
“Wings” Magazine Vol. 29 No.3, June 1999
-
“Midnight Reconnaissance–The RB-45
Tornado in Korea”, “Airpower” Magazine Vol. 23 No. 4, July 1993.
Review Text and Images Copyright © 2006 by
Phil Brandt
Page Created 13 December, 2006
Last updated 21 February, 2007
Back to HyperScale Main Page
Back to Reviews Page
|
 Home | What's
New | Features
| Gallery |
Reviews | Reference
| Forum
| Search
Home | What's
New | Features
| Gallery |
Reviews | Reference
| Forum
| Search