|
Russian Kilo Class
Attack Submarine
Trumpeter
S
u m m a r y
|
| Catalogue Number: |
05903 |
| Scale: |
1/144 |
| Contents and Media: |
53 parts in injection molded styrene |
| Price: |
USD$20.96
from Squadron.com |
| Review Type: |
FirstLook |
| Advantages: |
Well molded; good size; nicely
scribed detail; clear and well-illustrated instructions |
| Disadvantages: |
No ballast inlet detail; some fit
challenges at top of the hull |
| Recommendation: |
Recommended. |
Previewed
by
Gene Kozicki

Trumpeter's 1/144
scale Kilo Class submarine is available online from Squadron.com
The Kilo class attack submarine is a workhorse type of submarine
that is often overlooked in favor of the sexier nuclear ballistic missile and
fast attack subs made popular in the movies. The Kilo class boat is an attack
submarine, intended to engage surface ships and other submarines. It doesn’t
carry any guided missiles and is, in fact, a good old fashioned diesel-electric
powered boat.
It was first launched in the early 80’s and like many Soviet-era
ships, soon saw service in other countries – Iran, China, Poland, India, Romania
and Algeria, among others. The basic design of the Kilo class is sound, and
though not the most glamorous ship, is actually quite effective, being one of
the quieter diesel-electric submarines currently in use.
Because of its rather un-glamorous looks, it may be a surprising
choice for any plastic kit manufacturer to model, but Trumpeter seems to be
making a career out of making models that other companies won’t tackle. Upon
opening the box, the first impression is the size of the kit. Three basic hull
components will assemble into a model 20” long and 2-3/4” in diameter (full
height including the sail and periscopes will be over 5”). This model will
certainly dwarf any 1/350th scale subs on the display shelf next to it.
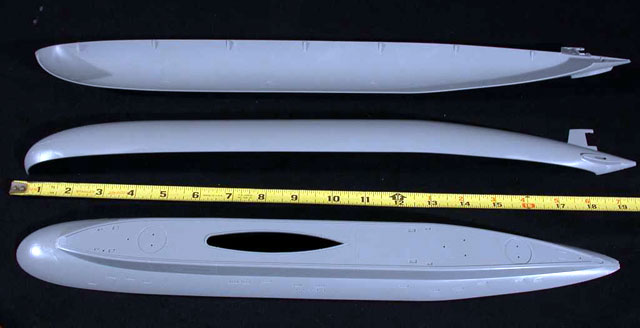
The kit consists of 53 parts spread out over three sprues. The top part of the
hull is its own separate part, with no sprue attachment points. A basic display
stand is also included. The parts are very well molded and no flash was present.
The evil ejector pin marks make only two appearances – on the back of a couple
of the periscope mounted radars. The detail is OK on these parts, though
superdetailers will probably replace them with parts out of the spares box.
Click the thumbnails below to view
larger images:
There is a fair amount of scribed detail on the hull and deck
parts. Major panel lines are present on all of the hull, as well as the sail.
Smaller hatches and panels are also featured on the main deck. All of the
panel/hatch lines are finely recessed and, again, perfectly square.
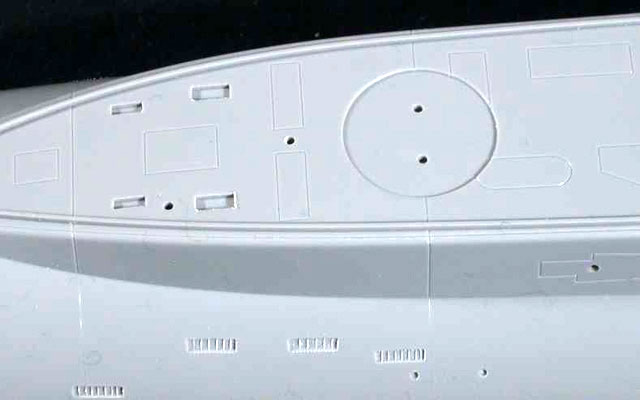
Trumpeter has molded a series of small rectangular vents just
above the waterline. They are slightly recessed, with some raised vertical lines
within the vents themselves. Looking at several photos of different Kilo class
submarines, the location and sizes of the real vents seem to vary from ship to
ship, so I guess Trumpeter made a decision to place them based on the references
they had access to. However, there is no ballast inlet detail whatsoever on the
lower portions of the hull. I’m not sure where it would actually be located, but
based on other photos I’ve seen of modern submarines, I feel that there should
be some type of ballast inlet detail on the bottom of the hull for those of us
building a full hull model.
The main hull is assembled out of only three parts. Two parts (below the
waterline) are split lengthwise, with a third part (above the waterline)
completing the main hull. This breakdown allows the builder the option of
building either a full hull kit or a waterline version. The only problem is that
the split line is not where the waterline is located. The actual waterline
appears to be Ľ” below the split on the kit. I really think this will only be
noticed if you are doing a dockside diorama with very still water. Any type of
waves in an “underway” display will effectively camouflage the mistake. The sail
is made up of another three parts.
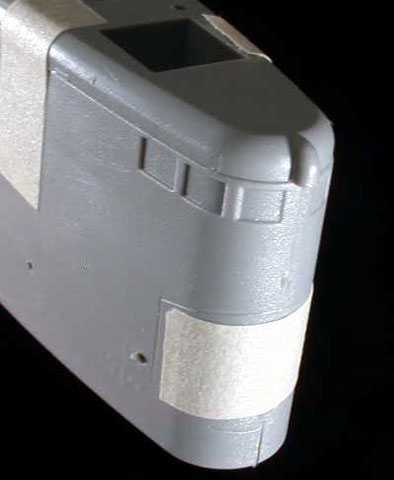
The remaining parts make up the multi-piece diving planes,
propellers (two types), bitts, escape hatches, and the various masts,
periscopes, and antennas. The escape hatch detail is simplified but acceptable.
The windows on the sail are recessed and perfectly square. The top surface of
the sail is devoid of any detail, save for the recessed areas for the masts and
periscopes. There is no vent detail on the sail, just slightly recessed squares.
Also, there are no parts for the temporary windscreen that the crew erects when
they are running in the surface. In this scale, you could probably build one out
of some strip styrene and clear acetate without too much trouble if you wanted.

Not seeing anything obvious in the box that would lead me to believe that there
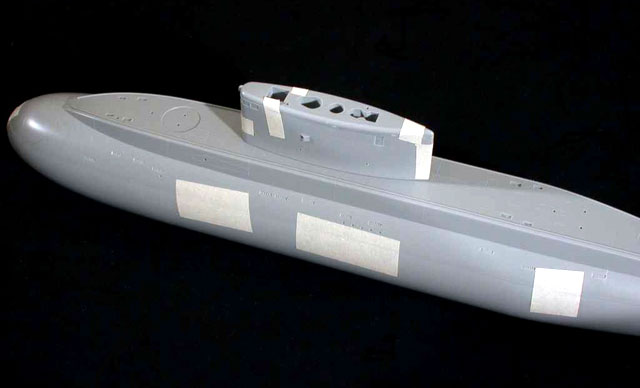
would be any problems, I decided to cut off the parts for the main hull and the
sail and tape them together to check the fit. Good thing I had some tape on
hand. The two parts that are split lengthwise fit together easily. The locating
pins actually work and all the panel lines line up at the seam. The fit of the
top part to the bottom parts is the problem. There are no locating pins to help
you lining up the parts. With just a bit of tape at the bow and stern, there was
a gap of about a Ľ” in the middle of the ship. The good news is that it is not
an insurmountable problem. The plastic is thin enough that it can be forced into
place without too much trouble. Doing so didn’t seem to cause any warpage.
Getting it to stay in place while the glue dries is going to be the real trick.
Care will have to be taken to ensure that the panel lines still line up, but I
think a combination of superglue, liquid glue and tape will get the job done.
Gluing one side at a time probably won’t hurt either. I don’t think the parts
are warped or otherwise defective, it’s just a side-effect of a long tube
divided up into three parts. The fit on the sail is a lot better, but still
needs a little finesse.
Click the thumbnails below to view
larger images:
The instructions are clear and well illustrated. Submarines are
fairly simple shapes with just a few details, and this kit is no exception.
There are a couple of options available to the modeler. The bow planes appear to
retract into the hull and you can either install them or leave them off entirely
(though the instructions don’t inform you of this). You also have the choice of
a 6 blade or 7 blade propeller, depending on which type of Kilo you are building
– the original 877 EKM or the newer Type 636 variant. Though the instructions
specify which antenna/mast goes into which space on the top of the sail, no
mention is made of displaying any of the masts or antennas in the stowed
position.
Decals are almost impossible to judge as they are white decals printed onto a
decal film with a white backing paper. The decals consist of two sets of depth
markings and white rings for the escape hatches. There are no numbers or
insignia, but then again, none of the references that I have found show anything
in the way of markings.
Accuracy?
Well, this is a Trumpeter kit. Keep in mind that there is
a debate raging all over the Hyperscale about the accuracy of their 1/24th P-51
Mustang, and to a lesser degree, about their 1/350th scale U.S.S. Hornet on
ModelWarships.com . Also keep in mind that I am not an expert in Russian
submarines. I was able to find several photos of the Kilo class on the internet
(some of them quite good and showing lots of surface detail) – but no drawings
that I would consider trustworthy. Basically, my assessment is this – it
certainly looks like a Kilo class submarine. The overall size of the finished
model is impressive. That’s good enough for me to build this kit.
The fit of the hull will be a challenge, but anyone who has
built a few ill-fitting kits will be able to manage.
Overall, I think this kit is a good value for the money.
Straight out of the box, the model will be impressive due to its large size.
Modelers who want to superdetail the sail area and ballast inlets have a good
starting point.
Recommended.
Text and Images Copyright © 2003 by
Gene Kozicki
Page Created 21 February, 2003
Last updated 12 August, 2004
Back to HyperScale Main Page
Back to Reviews Page
|
 Home | What's
New | Features
| Gallery |
Reviews | Reference
| Forum
| Search
Home | What's
New | Features
| Gallery |
Reviews | Reference
| Forum
| Search