|
Grand Phoenix 1/48 scale
"Ultimate"
Seafire FR.46/47
Grand Phoenix
S
u m m a r y
|
| Catalogue Number: |
#005 |
| Scale: |
1/48 |
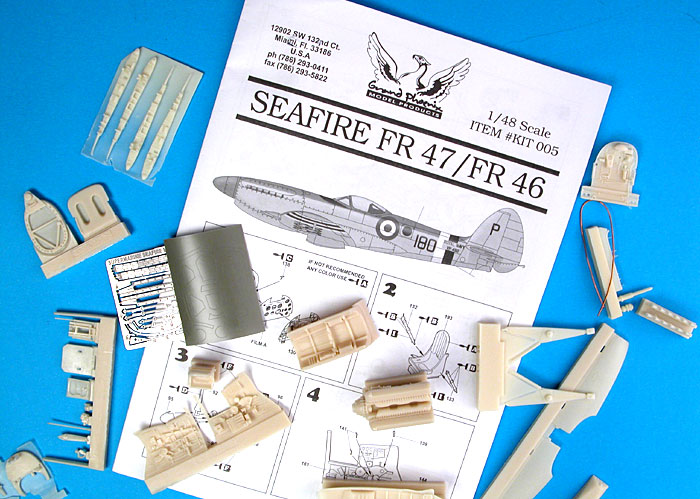
| Contents and Media: |
43 parts in pale yellow resin; 1
photo-etched fret; 1 sheet of self-adhesive masks (for canopy and
wheels); two lengths of copper wire. Also included in final package (but
not in review sample) Airfix 1/48 scale Seafire FR.46/47 kit; acetate
instruments; Aeromaster decals for three marking options |
| Price: |
USD$64.95
from Aeromaster / Grand Phoenix website |
| Review Type: |
FirstLook |
| Advantages: |
Excellent base kit (Airfix Seafire
46/47); ambitious and comprehensive details added to cockpit, engine and
wing folds; addresses several kit shortcomings; relatively simple
engineering; good quality instructions; three decal options; very
effective use of multimedia. |
| Disadvantages: |
Some modelling skills required |
| Recommendation: |
Highly Recommended |
Reviewed by
Brett Green

Grand Phoenix's
1/48 scale "Ultimate" Seafire Mk.46/47 may be ordered online from Squadron.com
When they were released in the 1990s, the Airfix 1/48 scale
Spitfire 22/24 and Seafire 46/47 kits were acknowledged as perhaps the best
Spitfire/Seafire kits produced in any scale.
I built one of these kits -
the Spitfire F.
Mk.24 - back in 1998,* and it was a fairly straightforward and pleasant
project. The only issues were a somewhat underdetailed cockpit (with a
thick-sided seat and solid spade grip on the control column), and a slightly
peculiar pair of cylinder head bulges on the engine cowls.
The new century has seen a heightened expectation of kit
detail. Grand Phoenix has now delivered detail in bulk to the Airfix 1/48
scale Seafire FR.46/47.
At Telford in November last year, Grand Phoenix announced
the forthcoming "Ultimate" line of model kits. These would be good quality
existing kits repackaged with multimedia details and high quality decals.
The 1/48 scale Grand Phoenix "Ultimate" Seafire FR.46/47 is the first of
this series, and should be available in hobby shops soon.
I was fortunate to recently receive an advance sample of the
resin parts, photoetched fret, masks and instructions that will be included
in the package. Please note that I did not receive the entire package - the
Airfix kit, Aeromaster decals and acetate instruments were not available at
the time. However, I do have an Airfix Seafire in my personal collection and
the quality is every bit as high as the Spitfire that I built in 1998.
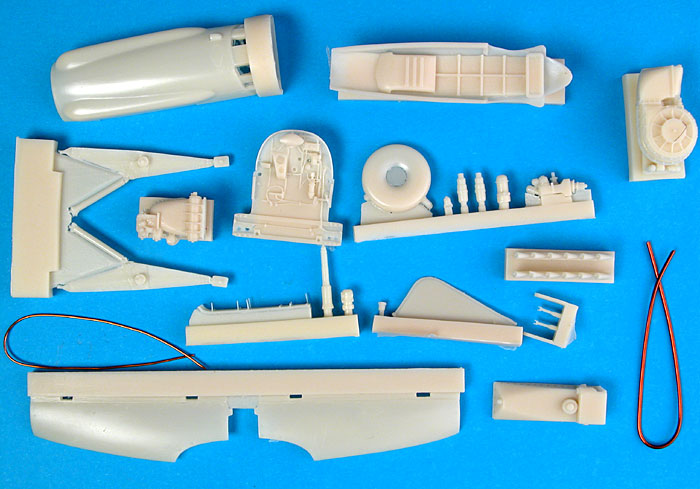
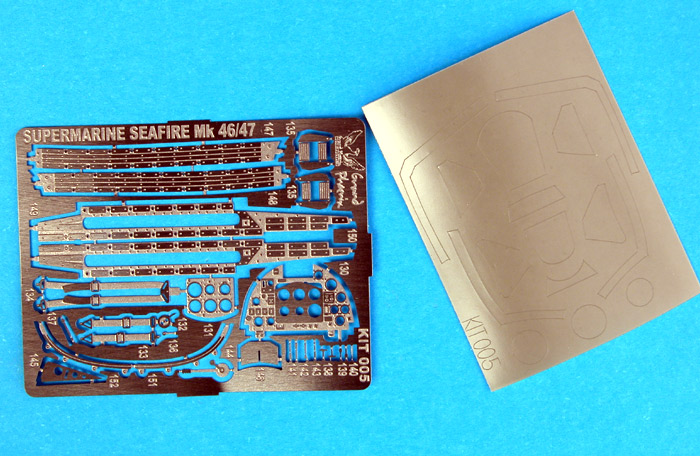
Multimedia components include 43 resin parts cast by Aires;
1 photo-etched fret from Eduard; 1 sheet of self-adhesive masks (for the
canopy and wheels); and two lengths of copper wire. The kit also includes
high quality instructions that incorporate all the plastic and multimedia
parts. The resin and photo-etched parts add detail to the engine area, the
cockpit and the wing folds.
The quality of casting of the resin parts is excellent.
The Engine
The engine is the jewel in the crown of this package. Detail
is gorgeous, yet the number of parts has been kept to a minimum. For
example, the engine block is cast with the cylinder heads, crankcase and
numerous other details already in place, simplifying construction
considerably.
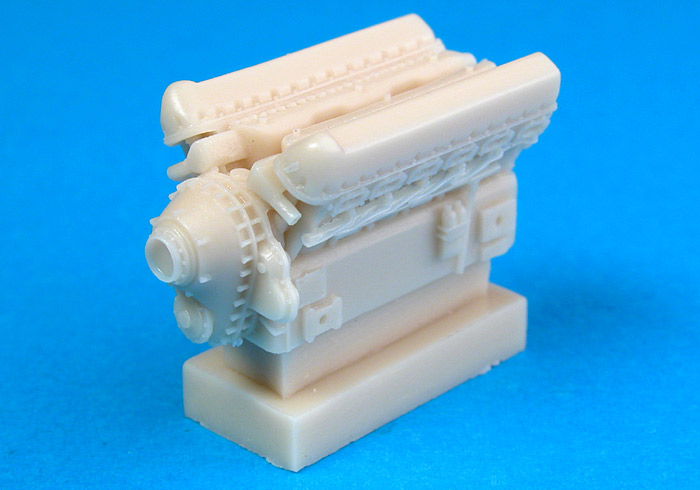
In addition to the engine itself, the kit supplies engine
mounts, firewall and replacement engine cowls. The cylinder head bulges on
the resin top cowl are a noticeable improvement in shape and location
compared to the kit parts.
The nose of the kit fuselage will need to be carefully cut
off to accommodate the new engine. The cuts are all along panel lines, which
should ease the task.
Cockpit
The cockpit builds up into a self-contained unit, with a
fuselage floor that includes structural detail, rear bulkhead, pilot's
armour plate, a nicely detailed seat correctly suspended over the control
rods, new sidewalls, control column with separate yoke, instrument panel,
gunsight and forward bulkhead.
The port sidewall features an open space for the pilot's
entry door. You'll certainly want to leave this open to display all that
lovely cockpit detail.
The raised detail moulded to the interior of the kit
fuselage will have to be removed before the resin cockpit can be installed.
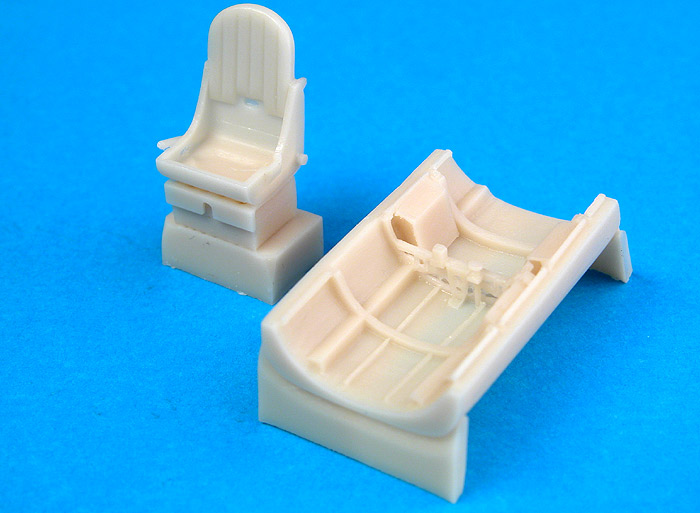
The seat is further enhanced with a photo-etched harness.
Small photo-etched parts will also be added to the sidewalls.
Wingfolds
Assembly of the wingfolds are simple in the extreme. One
resin part is inserted in both mating sections of each wing - four parts in
total. That's it.
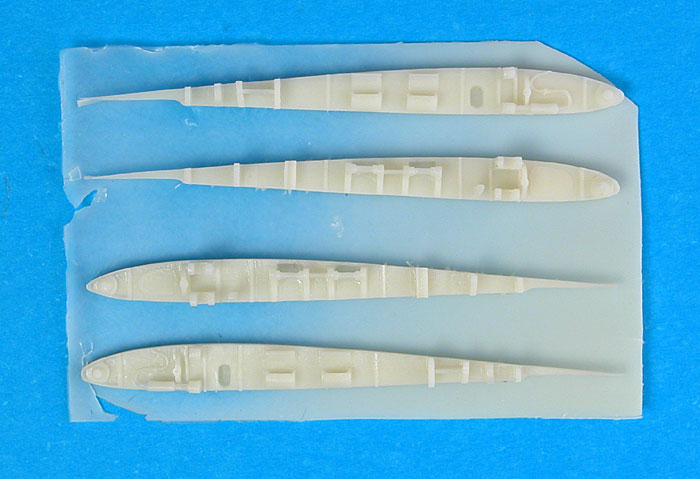
The Seafire 47 was the only aircraft in the family to
feature powered wingfolds. I checked several reference and could not find
any evidence of the wings folded with ordnance in place on Seafires of any
Mark, so you should probably ignore the instructions and leave the rockets
off if you plan to fold the wings.
I was delighted to hear the announcement of the Grand Phoenix "Ultimate"
series, and I am very impressed with the multimedia parts that will be
included with the premiere release.
The resin and photoetched parts will significantly add to the detail of
the original model but, as with all multimedia kits, extra time should be
taken to ensure that these new elements fit properly. A few minutes
test-fitting can save hours of frustration later in construction.
With all the resin, photo-etch, Aeromaster decals and masks in the box,
you certainly won't need to add many after market options! Well, maybe a
vacform canopy...
The Grand Phoenix "Ultimate" Seafire FR.46/47 looks like a very
impressive and accurate model.
Highly Recommended
Thanks to Gaston from
Grand
Phoenix for the review sample.
* Yes, I know that the Spitfire F.24 in the 1998 article is
supposed to be in Hong Kong; and yes, I realise that it looks like Julie Andrews
is about to burst out from behind the plane singing "the hills are alive
with the sound of music...". Six years ago I was still experimenting with
techniques (as I continue to do now), and on that occasion I used Photoshop to
superimpose the model and base over a background photo. In retrospect I probably
should have chosen something less alpine!
Review and Images Copyright © 2004 by Brett
Green
Page Created 05 May, 2004
Last updated 05 May, 2004
Back to HyperScale Main Page
Back to Reviews Page
|
 Home | What's
New | Features
| Gallery |
Reviews | Reference
| Forum
| Search
Home | What's
New | Features
| Gallery |
Reviews | Reference
| Forum
| Search