|
USS Enterprise NCC-1701
Bandai

HyperScale is proudly supported by Squadron.com
S
u m m a r y
|
| Catalogue Number: |
0116192 |
| Scale: |
1/850 |
| Contents and Media: |
56 parts in pre-painted plastic plus
lights, cables and electrical fittings. |
| Price: |
Ą6,500 (purchased from Japan) |
| Review Type: |
Construction |
| Advantages: |
Truly spectacular pre-painted
plastic; brilliant engineering; brings this science fiction subject to
life; includes clever lighting to main elements of the model; no glue
required; display stand included (integrating batteries and switch) plus
panels to close off mounting hole in model. |
| Disadvantages: |
Variable quality fit (95% excellent;
5% incredibly frustrating); some major joins do not cope well with
punishment of construction; very fiddly and cramped main junction for
electrical cables; brute force required to make some parts fit; external
wiring to warp nacelles. |
| Recommendation: |
Recommended to patient modellers |
Built and Reviewed by
Brett Green
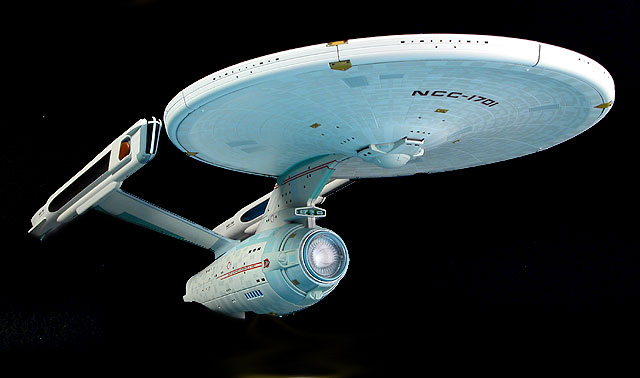
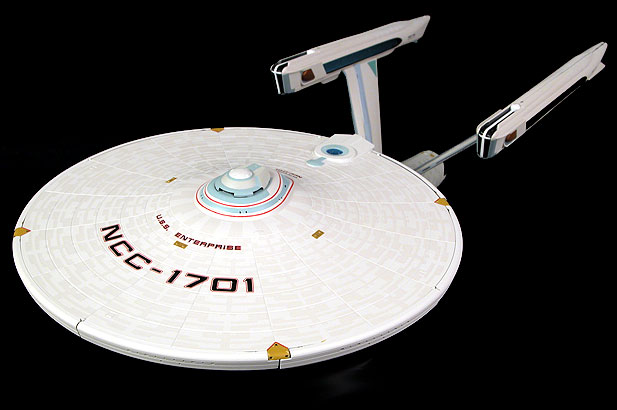
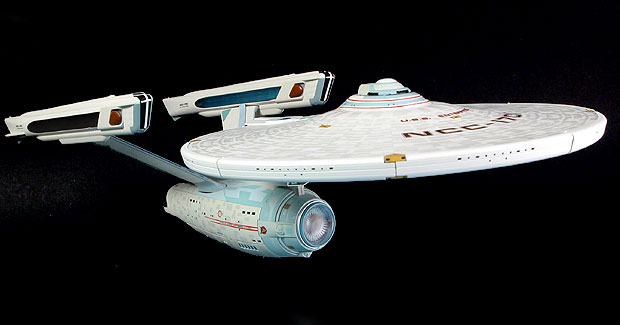
A snap kit? Pre-painted?
Yes indeed, but don't panic. Bandai's 1/850 scale USS Enterprise
is like no other snap kit you have ever seen.
The kit includes 56 parts in injection moulded plastic. Most of
the parts are pre-painted polystyrene, but there is also a mix of clear and
tinted plastic. Some of these parts seem to be a different plastic compound
(polyethylene perhaps). Panel lines, if that is the correct term, are fine,
crisp and consistent even in this small scale.
The quality of the painting and markings of the plastic parts is
absolutely stunning.
It is important to note that this is not coloured plastic
- the entire exterior surfaces of the parts have been painted. The
characteristic Aztek pattern is both subtle and amazingly involved. The pattern
is achieved more with varying texture and gloss levels rather than any
consciously noticeable colour difference. It is very impressive. The
coloured panels add variety and look great in the box and on the completed kit.
The markings are sharp and totally free of any imperfections. The overall
standard of finish is far better than most modellers (including myself) would be
able to achieve after a week of non-stop masking and spraying.
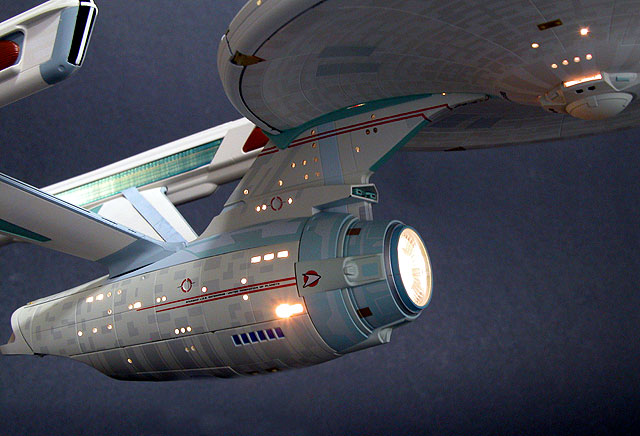
In addition to the basic shape of Enterprise, the kit also
includes six light bulbs, cables and various electrical fittings to permit all
the major elements of the model to be realistically lit.
At around 36cm long, the assembled model is not especially big
but detail is still easily visible.
Construction
I heard two reports that this kit could be built in a very short
time. Scott T. Hards from Hobbylink Japan finished his Enterprise in three
hours, and Dave Williams told me that he had finished his in four hours. Dave
commented that the model needed some adult size strength and swear words to get
it together though. His observation was prophetic!
I fancied the idea of a pleasant evening diversion, so I cleared
the workbench and started work.
It was quite easy to remove and clean-up the parts from the
sprues, but care is required not to damage the paint finish on the outside
surfaces. Bandai has helped here by moulding the sprue connectors on the inside
edge of the part wherever possible.
The base, incorporating the battery box and switch, was
assembled first then all the cables were cut to length. A word of advice here -
do not cut the cables longer than the template or you will not be able to stuff
the excess inside the kit parts. Next, I tested the bulbs with a single AA size
battery. No problems so far.
Assembly of the warp nacelles and saucer section went ahead very
well. I ended up with a largish seam on the bottom of each nacelle but these
cannot be seen from most angles.
I was not entirely happy with the fit of the nacelle support
pylons, and these continued to be troublesome through the rest of construction.
Also, the wiring is exposed along a recessed channel on the inboard surface of
the pylons. Instructions suggest that a self-adhesive covering strip is applied
prior to final assembly of the secondary hull, but I strongly advise leaving
this until everything else is finished.
One of the warp nacelles fell off its pylon when I started
working on the electricals in the secondary hull. When the nacelle fell off it
also stripped off the self-adhesive cover, and pulled out a few extra
millimetres of of wire. It was quite a challenge to feed the wire back into the
nacelle and I could not refinish the cover strip smoothly. That same nacelle
fell off about ten more times during remaining assembly.
All of the electrical wires come together in a central junction
inside the secondary hull. I found it fiddly to thread and tie the wires through
the tiny holes in the connectors. The next challenge was getting the secondary
hull sidewalls and bottom of the hull to fit. I had to disassemble and
reassemble the whole secondary hull a few times before I was satisfied with the
fit. In the end, there was still a fairly big gap on the top of the port
sidewall.
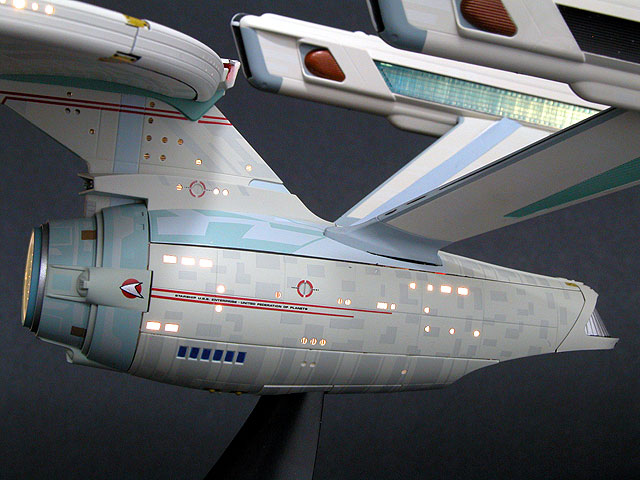
The fit at the hull top with each warp pylon was not especially
good on my kit either.
It should be noted that a fair amount of brute force is required
set these pieces in place, but extreme care must be taken to get all the tabs
located correctly first, and to follow the sequence of the instructions to
the letter. Otherwise, you will risk bending or breaking a locating tab -
then you'll really be in trouble!
With the kit now assembled, I added batteries and slotted the
model onto the base. I was ready to turn on the lights. Drum roll please...
switch on...
Nothing.
I assumed that I had crimped a cable while I was repeatedly
reassembling the nacelle and hull, or possibly disconnected something from the
main junction with the force of assembly, or screwed up in some other way.
However, I decided to eliminate one possible problem. I connected some loose
wires to a battery, then touched them to the contacts in the bottom of the hull.
Voila! The ship lit up! The problem must have been in the base.
I dismantled the base and found that one of the connectors in
the top of the base was not touching the steel strap in the vertical section. I
bent the contact upward to improve contact and the lighting worked perfectly.
Construction took between four and five hours, even with the
troubleshooting and self-imposed problems.
In my opinion, the Bandai 1/850 USS Enterprise kit is a
fascinating example of what might become a significant direction for our hobby
in the forseeable future, and not just in the realm of science fiction.
On the one hand, the quality and complexity of today's injection
moulded kits is constantly rising. This is great for experienced modellers, but
it must be intimidating to the new or casual hobbyist.
On the other hand, die-cast model aircraft and vehicles have
mushroomed in the last few years. Many of these pre-assembled and pre-painted
kits pass the test at a distance of four feet, but details and finish is still
quite crude compared to their injection moulded plastic counterparts.
Imagine a company like Bandai turning its attention to, for
example, modern US Navy aircraft for inspiration. How about an F-14, pre-painted
and pre-marked, with perfectly applied patchy weathering and snap-fit
engineering permitting completion in 3 to 4 hours.
It might not be an attractive idea to us crusty old modellers
who yearn for paint vapours, procrastination and polystyrene cement; but it
might be an a logical step between die-cast collectibles and conventional
scale model kits.
Bandai's 1/850 scale USS Enterprise is a remarkable and
ambitious model. The finish is truly spectacular even though I was frustrated by
some elements of construction.
I do hope that we see perhaps a non-electrified version of this
kit; plus more variants of the Enterprise (and Voyager too) from Bandai in the
future.
It will be interesting to see how Bandai goes boldly where no
model company has gone before!
Recommended.
P.S. My wife has been devoutly and
consistently unenthusiastic towards anything related to models over the years. I
can't blame her really.
However, when I trotted out
Enterprise and turned on the lights, she actually said "Wow, that's great!".
Even more encouraging, she immediately wanted to turn out the room lights to see
how the model looked under its own illumination.
As far as I am concerned, that
is an endorsement that money can't buy!
Model, Review Text and Images Copyright © 2003 by Brett
Green
Page Created 13 May, 2003
Last updated 09 November, 2003
Back to HyperScale Main Page
Back to Reviews Page
|
 Home | What's
New | Features
| Gallery |
Reviews | Reference
| Forum
| Search
Home | What's
New | Features
| Gallery |
Reviews | Reference
| Forum
| Search