|
De Havilland
Vampire
Single Seat Export Versions
Classic Airframes
S
u m m a r y
|
| Catalogue Number: |
495 - De Havilland Vampire Single
Seat Export Versions |
| Scale: |
1/48 |
| Contents and Media: |
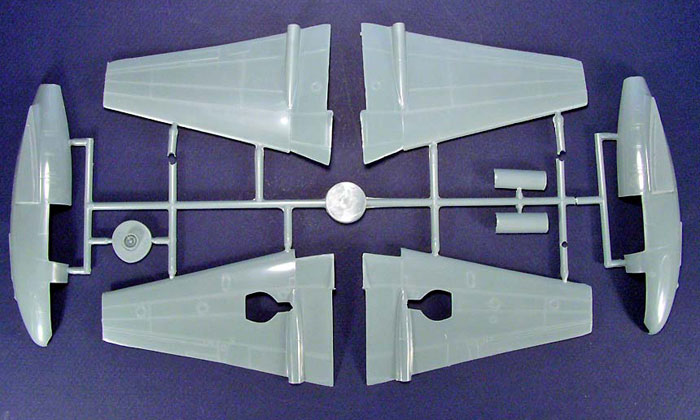
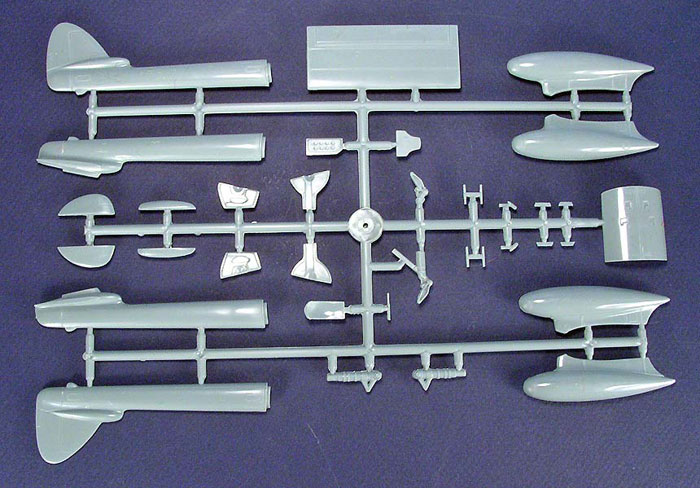
42 parts in gray styrene, 23 parts in gray colored
resin and 2 clear injection molded parts. Instructions, decal sheet and
painting guide for 6 aircraft. |
| Price: |
MSRP
USD$45.00 |
| Review Type: |
Another Look |
| Advantages: |
Fine panel lines, highly detailed cockpit
sidewalls, crisply printed decals, additional resin parts to make
different Marks; re-designed intakes. |
| Disadvantages: |
Some missing decals for the RAAF “Red Vampire”,
fuselage pod. |
| Recommendation: |
Recommended |
Reviewed by Steven "Modeldad" Eisenman

Classic
Airframes' 1/48 scale Vampire Foreign Version may be ordered online from Squadron
The Vampire
Chronicles
Chapter I, “The Good
Intentions"
Sit back my friends, and allow me to narrate the
saga of the infamous Vampire Chronicles - a gentle tale of how the
seekers of truth and accuracy were able to live in harmony with those
for whom what was in the box was good enough. This tale has been handed
down from modeler to modeler over the ages, and today we gather once
again to recount the adventure of the Vampire.
Now where do I begin?
Ah yes, first the earth cooled. Then there were the
dinosaurs, which died out. This mass extinction gave mankind the raw
material necessary for the rise of injection molded model kits. In the
medieval times of model making, there was a Vampire kit. But, it was
found to be badly deformed. Modern modelers gave it the Latin name of
Hobbycraftus Vampiremisshapenensis. There was much wailing and
gnashing of teeth that nothing better existed.
Then along came a man out of the City of Broad
Shoulders, who single handedly tried to improve upon what had gone
before. Without benefit of vast sums of money, or an R/C cash cow
business on the side, but with good intentions, this man went forward
and took a risk. Lets us refer to this man as “Uncle Jules”, for that
is what all the villagers called him when he appeared at their annual
gathering. It is at this gathering that praise is given to the gods of
styrene and resin and etched metal.
Now Uncle Jules, of limited resources and good
intentions, had come upon some drawings of the elusive Vampire. But
were these drawings accurate? Was there reason to disbelieve the
dimensions printed upon that much revered ancient parchment? Could they
be relied upon? No one had raised a voice to declare them false or
declare them merely the scribbling of a mad man. Could he? Should he?
No matter, he did.
It was done. The Vampire was produced. This was to
be the best model to date of this classic airframe. Lo and behold, in
the box it looked good. Even at first sight, no voices were raised
declaring it to be, at best, screwed up, or, at worst, evil incarnate.
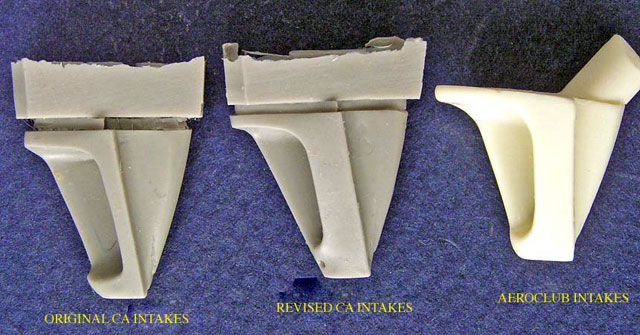
Then some began to apply glue to plastic and resin,
and something seemed amiss. It just didn’t look right! It looked a bit
off, and those intakes, those poor misshapen intakes, what was to be
done.
Now the villagers scurried for pictures and drawing
and plans. A Viking from Norway was one of the first to come forth with
comparisons. There was further comment and Photoshopping, and the
drawings used and the model made from them were now declared suspect.
As for those intakes, solutions were proposed. Even the bald headed
Magus from the mythical land of Oz took from his magic bag file and
putty to seek a solution.
As in the tales of old, the reasoned voice of a
noble craftsman, honest and true, and from the Guild of Aftermarket,
came out of the mists, from the Isle of Great Britain. This Guildsman
goes by but the name of “Johnadams of Aeroclub”.
Johnadams, after giving thoughtful consideration to
all that mankind knows of the Vampire and having spent time with the
real beast, truly and honestly declared the kit to be short in fuselage
and cockpit and the intakes bollixed. Drawing upon his deep well of
knowledge, he did also declare that Uncle Jules’ Vampire was still far
superior to the medieval Hobbycraftus Vampiremisshapenensis.
Even knowing that there were angry villagers armed
with number 11 blades, scribing tools and razor saws, Uncle Jules
stepped forward and let his disappointment be known to one and all.
Notwithstanding his good intentions, Uncles Jules declared that he now
understood that the drawings he used were not accurate. But, sadly, he
knew the die was cast for the styrene of this kit, but not for the
resin.
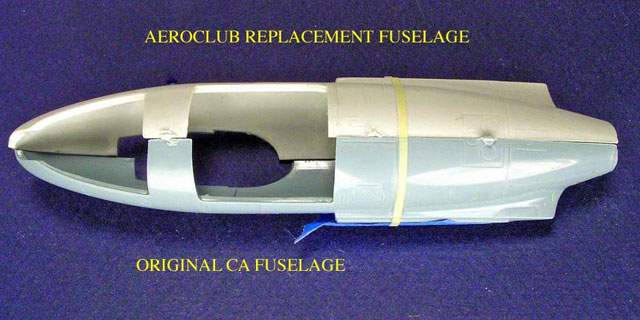
Johnadams, in a collegial effort to see that those
who wanted a near perfect Vampire get one, literally beat the sword of
criticism into the plow shear of styrene and resin. In barely a
fortnight, Johnadams created new resin intakes and a new injection
molded fuselage pod to be offered to those amongst the villagers who
were true believers in the Vampire. And at a fair price no less. The
villagers now had options, either to build the best out-of-the-box
Vampire to date, or the most accurate Vampire model to date.
Oh the joy! The villagers could choose of their
own free will. Now they had information. As for Johnadams of Aeroclub,
after all that he had said and done, he was not declared a heretic, a
destroyer of hobbies, and was not subjected to the Modelers’ Inquisition
for speaking the truth. No one ever expects the Modelers’ Inquisition!
The Vampire
Chronicles
Chapter II, “The
Foreign Version”
Now we enter the second chapter of the Vampire
Chronicles with the release of the “Foreign Version”.
Upon opening the box one discovers an extra bag of
resin goodies. After opening the bag, and spilling out its contents
like rune stones on the desk, one finds a second set of intakes. Four
intakes? What manner of Vampire is this?
Holding them up next to the intakes that are in the
other bag of resin, which was included in the previous boxing, one can
immediately see the new intakes are different. Based on the work of the
Magus of Oz and others, it appears that Uncle Jules had the intakes
recast into a more pleasing shape. Of course, such shape had to remain
appropriate with the existing fuselage pod and wings, for which the die
was cast, as noted in Chapter I. We must await the reaction of those
villagers for whom building this Vampire will be an out-of-the-box
effort.
But what of the other resin bits and pieces of
which I spoke? There is a new nose and gear door so that one can make a
FB. 6 of the Swiss Air Force.
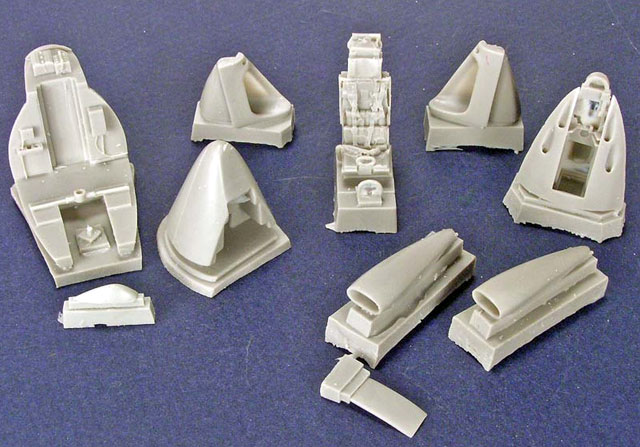
There are the fuselage intakes and nose “blister”
so that a FB. 31 of the RAAF can be made. It should be noted that the
instructions for the Australian version show the blister as more of a
scoop but the shape of the resin part is correct. Reference photos of
the RAAF FB. 31 should be used to determine its exact placement. For
example, A79-308 pictured at this web site:
http://www.ctie.monash.edu.au/hargrave/MEGGS_vampire.html.
It also should be noted that one of the fuselage intakes is packed loose
and not in the bag of additional resin. Take care, for the feared
carpet monster has been known to devour resin bits.
Finally, the new resin provides for the more modern
MB ejection seat. The parts include the seat, cockpit base and bulkhead
and nose wheel bay.
Click
the thumbnails below to view larger images:
All the other pieces in this version of the Vampire are the same as in
the first FB. 5 boxing.
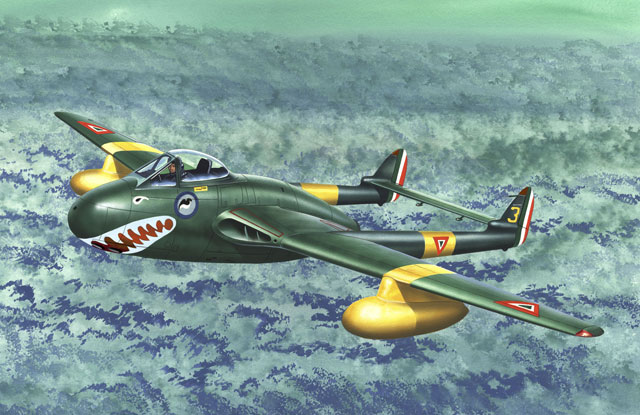
The Foreign Version of the Vampire contains
markings for six different aircraft from four different air forces. We
begin with the markings for the Vampire pictured in the box art.

Click
the thumbnails below to view larger images:
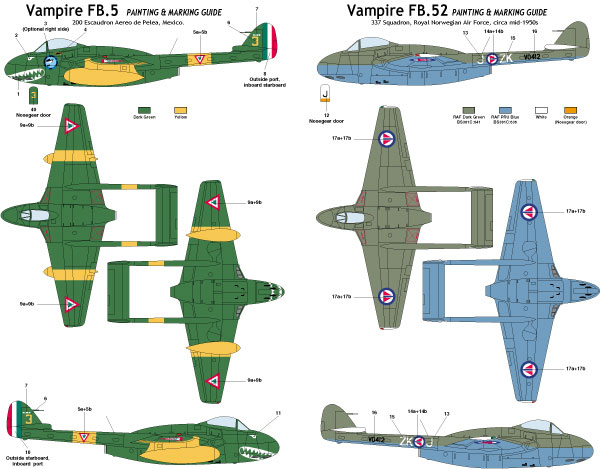
Mexican Air Force – Vampire FB. 3,
200 Escaudron Aero de Pelea. This aircraft is
over-all Dark Green with Yellow bands around the booms and around
the wings. The auxiliary tanks are also in yellow. No FS.
approximation is given for either color. The red at the top of the
forward tip of the fin must be painted. I have heard some rumblings
that the squadron badge is not accurate, but I am unable to
determine whether this is true or not.
Royal Norwegian Air Force – Vampire FB. 52
VO412 / ZK-J, 337 Squadron, circa mid-1950s.
This aircraft has a RAF Dark Green top surface with PRU Blue
undersides. There is an Orange horizontal stripe across the nose
gear door.
Royal Australian Air Force – Vampire FB. 31
Two different markings for the same aircraft:
A79-215, No. 25 Squadron (City of Perth). The first set of markings
are for an all Aluminum painted aircraft circa 1959. The second set
are for the same aircraft in the all Post Office Red special scheme
that was applied for the Squadron’s stand down from flying duties,
at the end of 1959 or early 1960.
There does, however, seem to be a number of
problems with these markings. I will first deal with the issue of
making the FB. 31. It appears that the FB. 31 had a large, oval
panel on the starboard / right side, just below the cockpit. This
panel is neither on the fuselage in the kit nor on the Aeroclub
fuselage pod. It will need to be scribed.
As to the markings for the Aluminum painted
aircraft, the marking instructions show the Squadron’s black swan on
the port / left side only. Based on a recent article by Mick
Mirkovic in the January 2005 issue of Scale Aviation Modeller
International, the black swan was also carried on starboard side of
the nose at one stage. Also, for the time period in question, the
Type 2 badge was used, where the swan was placed over a red “25” and
was surrounded with the stenciling “City of Perth Fighter
Squadron”. The Swan on the decal sheet, #25, is a Type 1 badge used
to early 1957, and the number and writing should be in red. To
properly do A79-215 in its pre-1957 guise, a second badge would be
required, the writing would need to be in red.
For the special Post Office Red scheme, the
kit’s marking diagram shows the swan applied to both sides of the
nose, as was actually the case. The painting instructions indicate
a Squadron Leader’s pennant on the starboard side, but there is no
decal provided for this. However, later in this aircraft’s career
the pennant was removed and the oval panel – mentioned above – was
stripped back to natural metal, so this will be another option. The
radio housing blister on the nose was left in the Bakelite brown.
According to Mirkovic, the serial number was simply in Sky Blue,
whereas the kit markings have the Sky Blue serial on a white
background. Some photos support the blue theory, while a color photo
seems to suggest a white outline. The decals are supplied in two
parts each, so the modeler can consult his references and make up
his own mind.
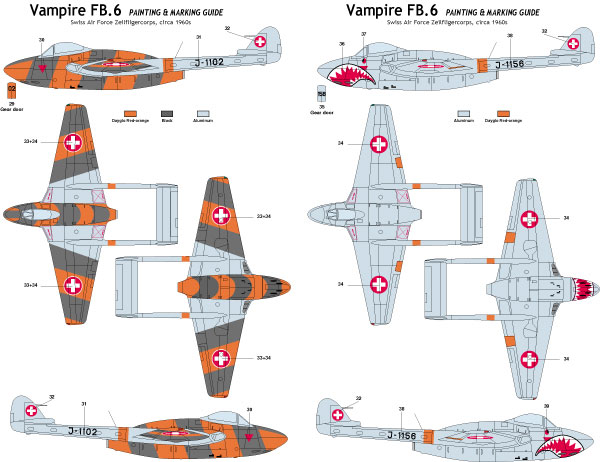
Swiss Air Force – Vampire FB. 6
markings for two aircraft:
J-1156, Zeilfligercorps, circa 1960s. This
aircraft is in over-all Aluminum with orange bands on the booms.
J-1102, Zeilfligercorps, circa 1960s. This
aircraft is in Aluminum with Dayglo Red-Orange and Black bands
applied to the wings and fuselage.
What can one say? We now have quite a good Vampire
kit, even if we know that it is not perfectly accurate. Modelers will
have to make decisions, as they have in the similar case of the Hasegawa
Mk. IX Spitfire. For those that want a Spitfire or Vampire and for whom
the 3mm of shortness, approximately the same in both kits, is not a big
issue or the end of the world, then they will decide to buy and build
right out of the box.
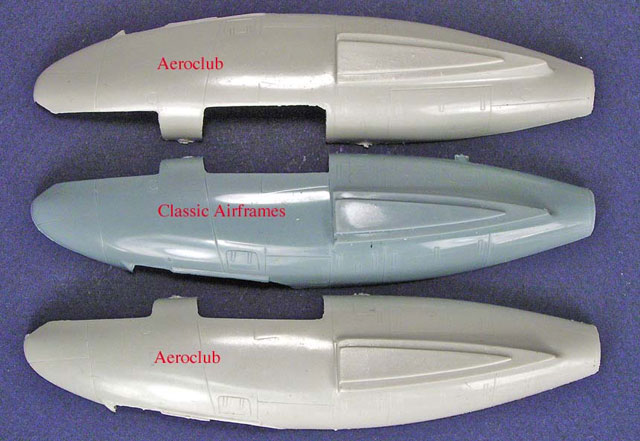
For those modelers who have a passion for either of
these aircraft and who want a more accurate Mk. IX Spitfire or Vampire,
then they have other options. In the case of the Spitfire, it is either
the ICM kit or the Loon Models correction fuselage. In the case of the
Classic Airframes Vampire, there is the correction fuselage pod and
intakes from Aeroclub.
Click
the thumbnails below to view larger images:
As for me, not being a “Vampirephile”,
building the Vampire OOB, would have been perfectly fine. Then again, I
bought the Aeroclub sets primarily to see and understand the real nature
of the issue, and I will use them as long as I have them. I have shown
the CA / Aeroclub parts in the photographs accompanying this review. As
to the Spitfire, I love the lines of that aircraft, so I have chosen to
forgo the far better engineered Hasegawa kit, having built one, in favor
of the ICM kits.
Very simply, if you want a good out-of-the-box
representation of the Vampire, then the Classic Airframes kit is it. If
you want a better representation, then you will get the Classic
Airframes Vampire and the Aeroclub sets. Still recommended. You make
the decision.
Thanks to
Classic Airframes for
the review sample.
Classic Airframes
kits are available worldwide through hobby retailers and from
Squadron.com
Review and Images Copyright © 2005 by
Steven "Modeldad" Eisenman
Page Created 02 May, 2005
Last updated 02 May, 2005
Back to HyperScale Main Page
Back to Reviews Page
|
 Home | What's
New | Features
| Gallery |
Reviews | Reference
| Forum
| Search
Home | What's
New | Features
| Gallery |
Reviews | Reference
| Forum
| Search